
DIY bike fitting: adjusting your road bike riding position
With this guide, you can do your own bike fitting and adjust your road bike sensibly step by step: shoes and cleats first, then the saddle, followed by the cockpit, handlebar and shift levers. The aim is a comfortable, controllable and efficient position without unnecessary pain in your knees, hands, back or neck.
DIY bike fitting: the right order for beginners
Many beginners first change the stem or tilt the saddle, even though the cause often lies with the cleats, saddle height or saddle setback. If you want to do your own bike fitting, always adjust your road bike in a sensible order. This also helps you know later which change actually helped.
This guide is deliberately practical. If you are searching for road bike fitting or road bike fit, here you will find a simple DIY sequence without a professional lab: a tape measure, spirit level, Allen key, tape, some patience and short test rides are enough to get started. Difficult issues such as pronounced knee misalignment, pain despite adjustments or complex cockpit modifications should be left to a bike fitter.
DIY bike fitting: checklist in the correct order
Start with shoes and cleats because they directly affect your foot and knee position.
Then calculate saddle height using inseam length × 0.883 as a good starting value.
Set the saddle nearly level rather than tilting it steeply forwards.
Change saddle setback only in small increments and test each change.
Adjust handlebar height using spacers only as far as your bike safely allows.
Check reach through stem length and handlebar shape: neither too stretched out nor too cramped.
Position the shift levers so your wrists stay neutral and the brakes are easy to reach.
Ideally consider handlebar width when buying, as it cannot be adjusted on every road bike.
Adjusting road bike cleats: the foundation of your pedal position
Before changing your saddle or handlebar, check your shoes and cleats. Especially in DIY bike fitting, cleats are the sensible first step because they determine where your foot sits on the pedal and the angle at which your knee works while pedalling. A poor cleat position can cause knee problems, numb feet, pressure beneath the ball of the foot or uneven pedalling.
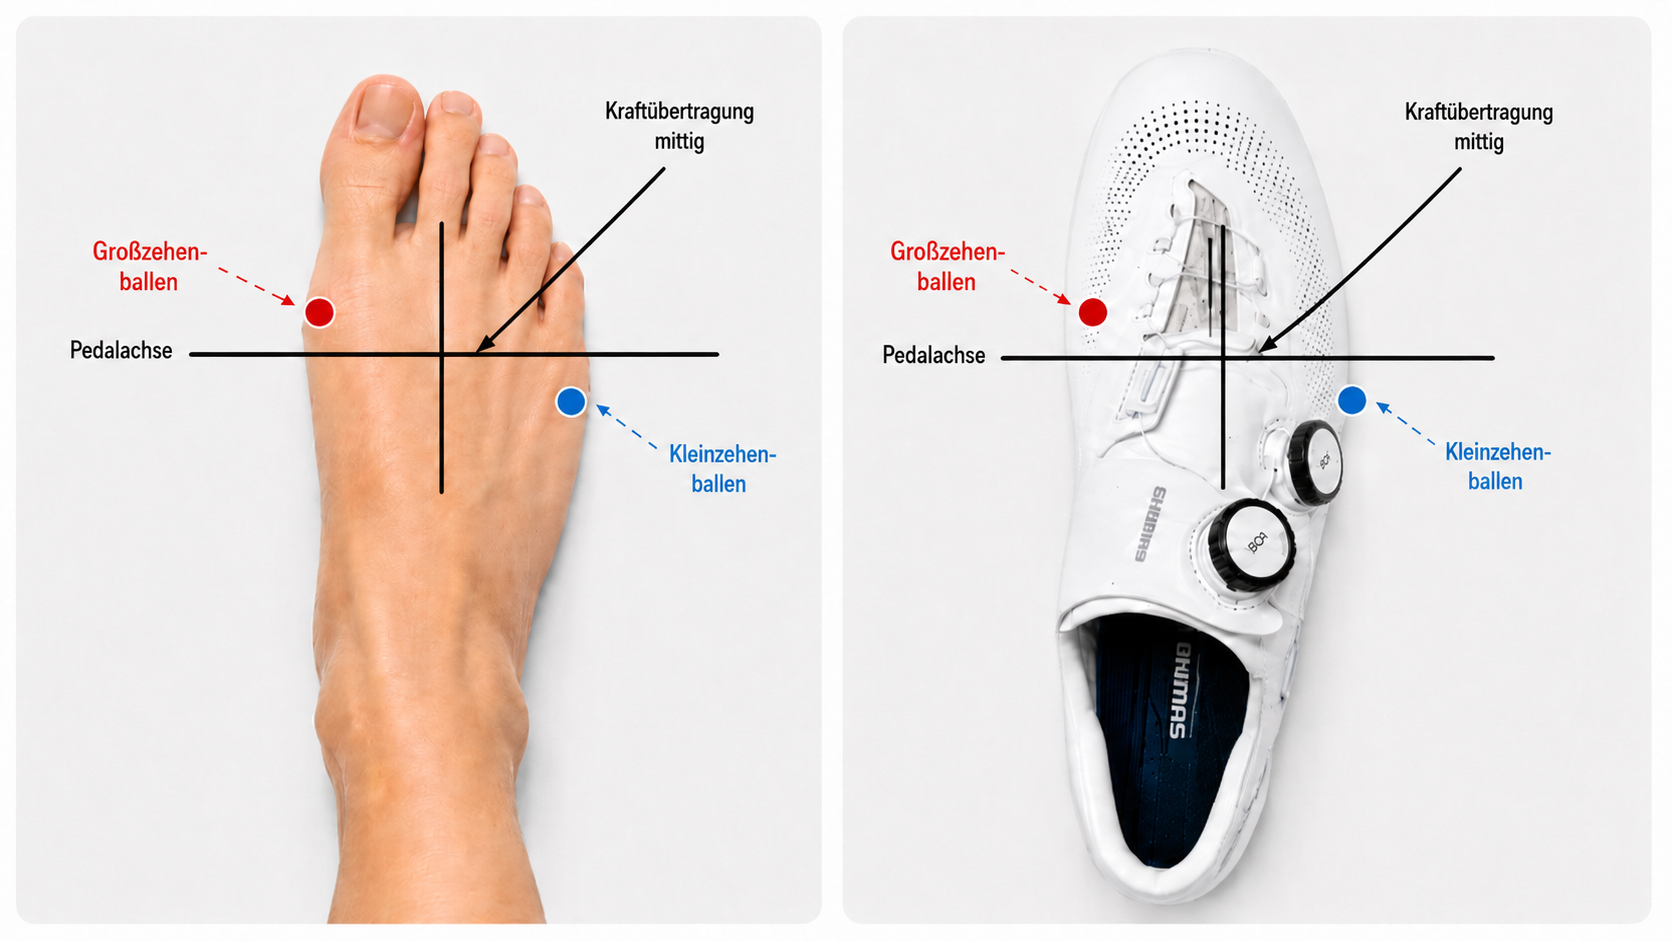
Optimal pedal axle position
The pedal axle runs midway between the ball beneath the big toe and the ball beneath the little toe, enabling central power transfer, better pressure distribution and an ergonomic foot position on the pedal.
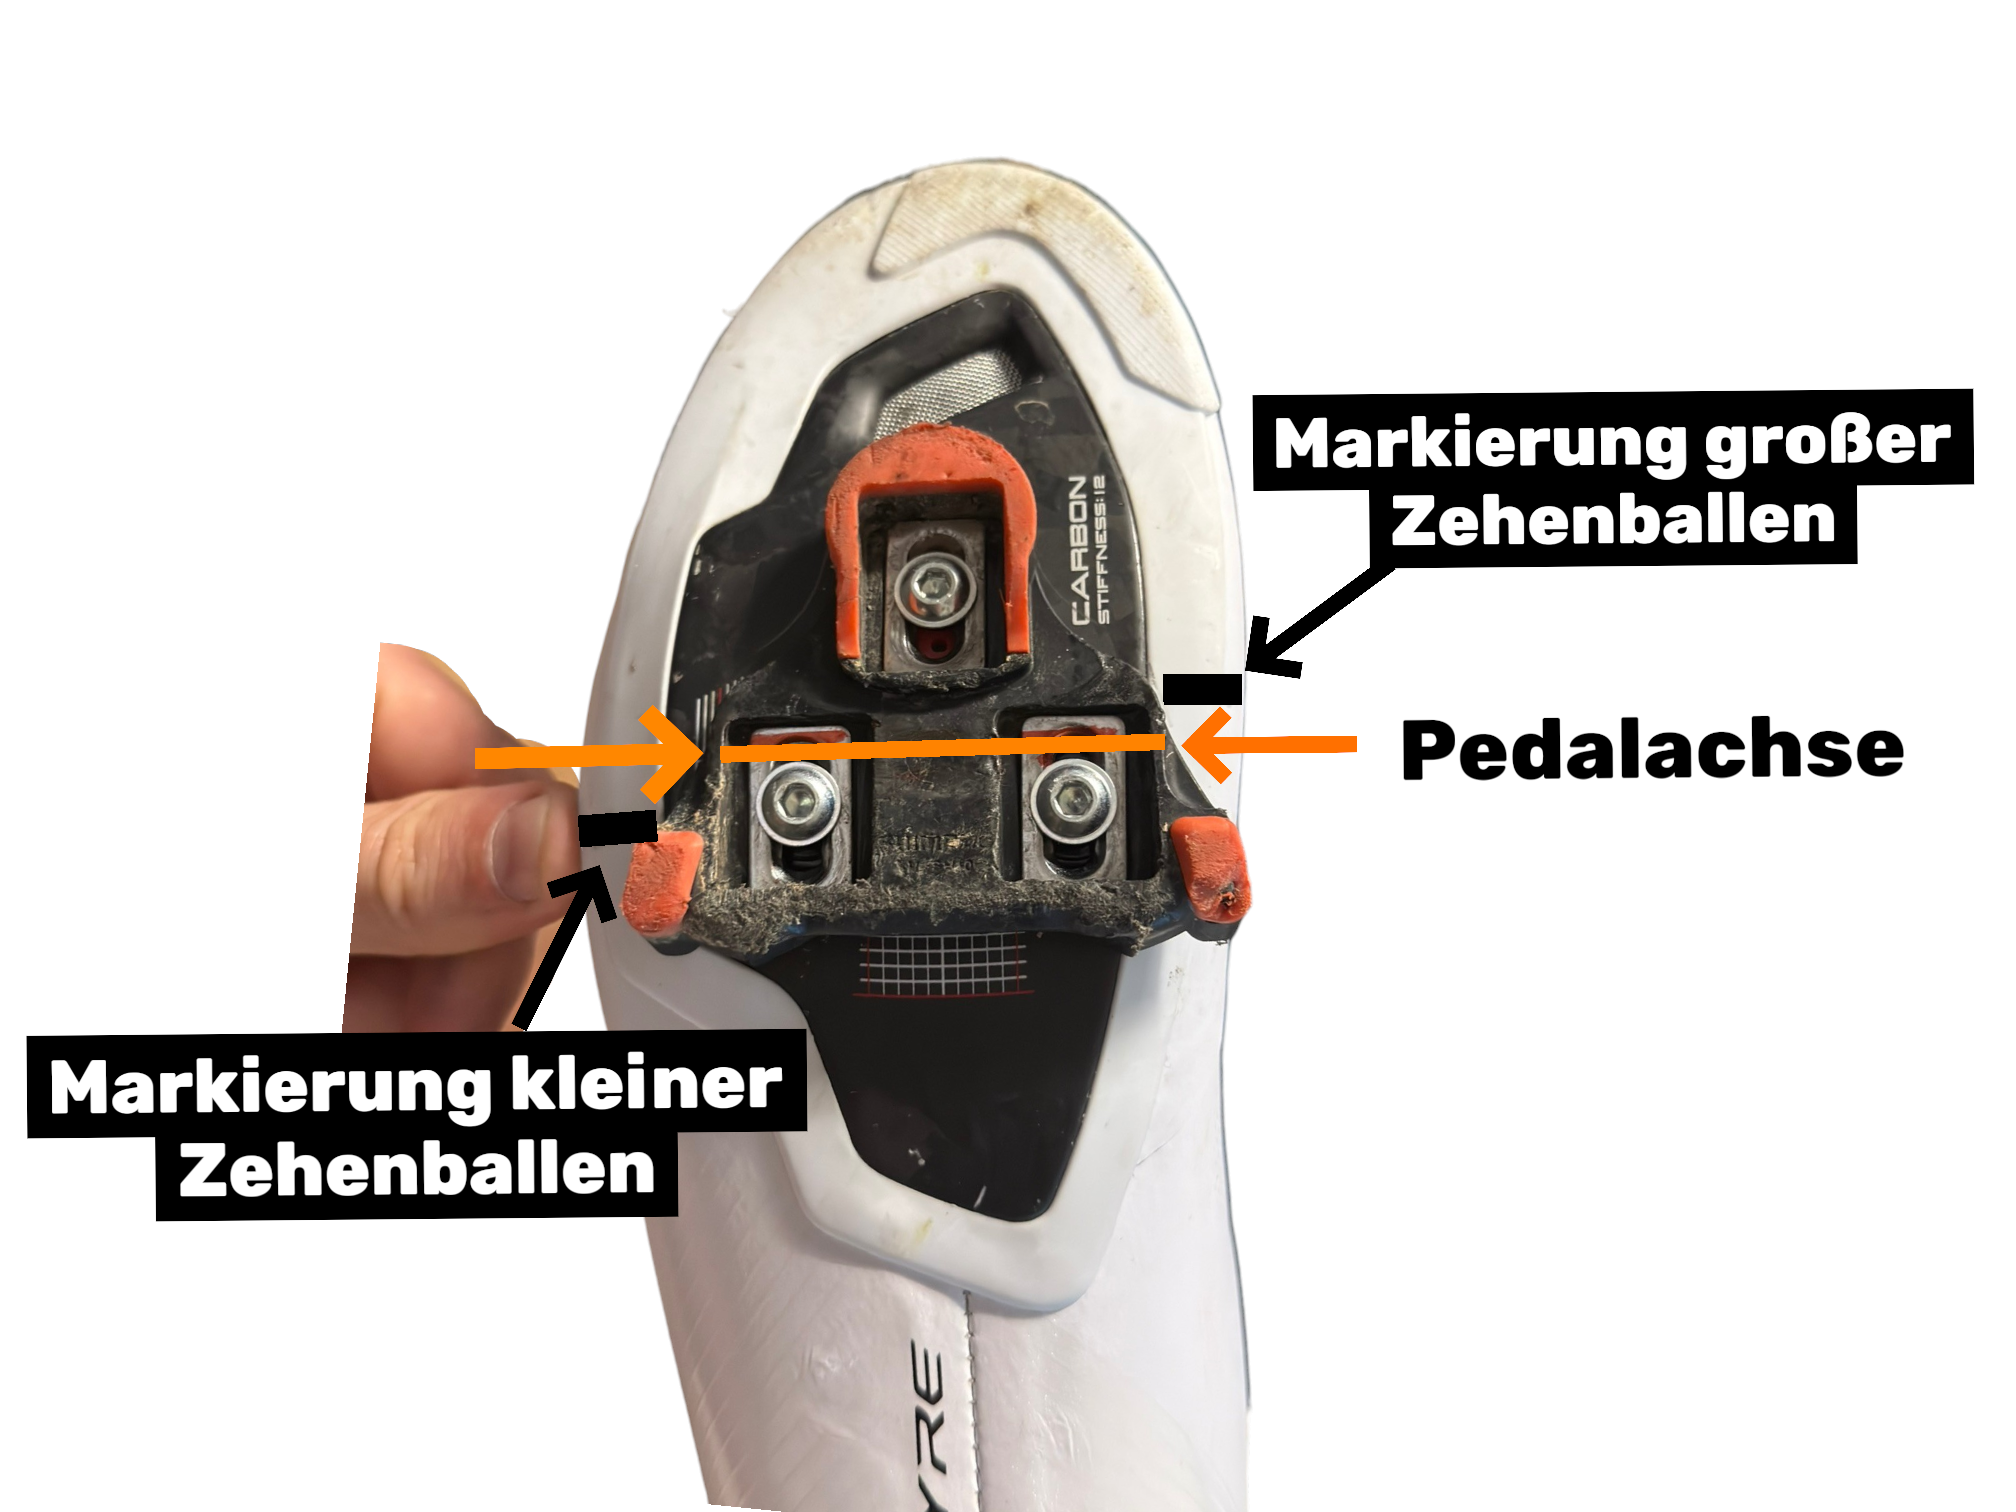
Marking the sole and aligning the cleat
Locate the balls beneath the big and little toes through your road cycling shoe and mark the points.
Adjusting road bike cleats: a simple beginner's method
- Find the ball of the foot: feel for the ball beneath the big toe and the ball beneath the little toe. Mark the positions on the outside of the shoe with tape.
- Position the cleat roughly centrally: as a starting point, the pedal axle should sit approximately beneath or slightly behind the line across the ball of the foot. For many beginners, slightly further back is more comfortable than too far forwards.
- Start with a neutral lateral position: do not position the cleat excessively far inwards or outwards. Your knee should not visibly move inwards or outwards when pedalling.
- Respect your natural foot angle: if your toes point slightly outwards when standing barefoot, the cleat must not force your feet to point completely straight ahead.
- Tighten lightly and test: ride easily for 10–20 minutes. Check for noticeable pulling in your knee, sole or hip.
- Then tighten properly: tighten the bolts evenly according to the manufacturer's instructions. Check them again after the first rides.
| Problem | Possible cleat-related cause | Beginner's adjustment |
|---|---|---|
| Pressure directly beneath the ball of the foot | Cleat may be too far forwards | Move cleat 2–3 mm backwards |
| Pulling on the inside or outside of the knee | Foot angle or lateral position is unsuitable | Change rotation very slightly; do not force it |
| Foot goes numb | Pressure point, shoe too tight or unfavourable cleat position | Loosen shoes, move cleat slightly back, check insole |
| Uncertain clipping in | Cleat loose, worn or incorrectly fitted | Check bolts and cleat condition |
Which cleat colour suits you?
With Shimano SPD-SL cleats, the colour generally indicates freedom of movement, known as float: yellow has around 6° of float, blue around 2° and red has 0°. If you are starting road cycling or want to do your own bike fitting, yellow cleats are usually the safest starting point because your foot has some freedom of movement and minor adjustment errors are more forgiving. Blue cleats feel more direct; only ride red cleats if your cleat position is truly precise.
Advertisement: View suitable cleats for step 1 →
The limits of DIY bike fitting
If you have recurring knee problems, pronounced leg alignment issues, significant foot deformities or pain despite small changes, have your cleats adjusted professionally. Wedges, insoles and complex rotational settings are not things to experiment with blindly.
Adjusting road bike saddle height: finding the right height
Saddle height is one of the most important bike fitting points when doing your own fit. If the saddle is too low, you often put stress on the front of the knee and lose efficiency. If it is too high, you overextend the leg, rock your pelvis and often develop pressure points or pain behind the knee.
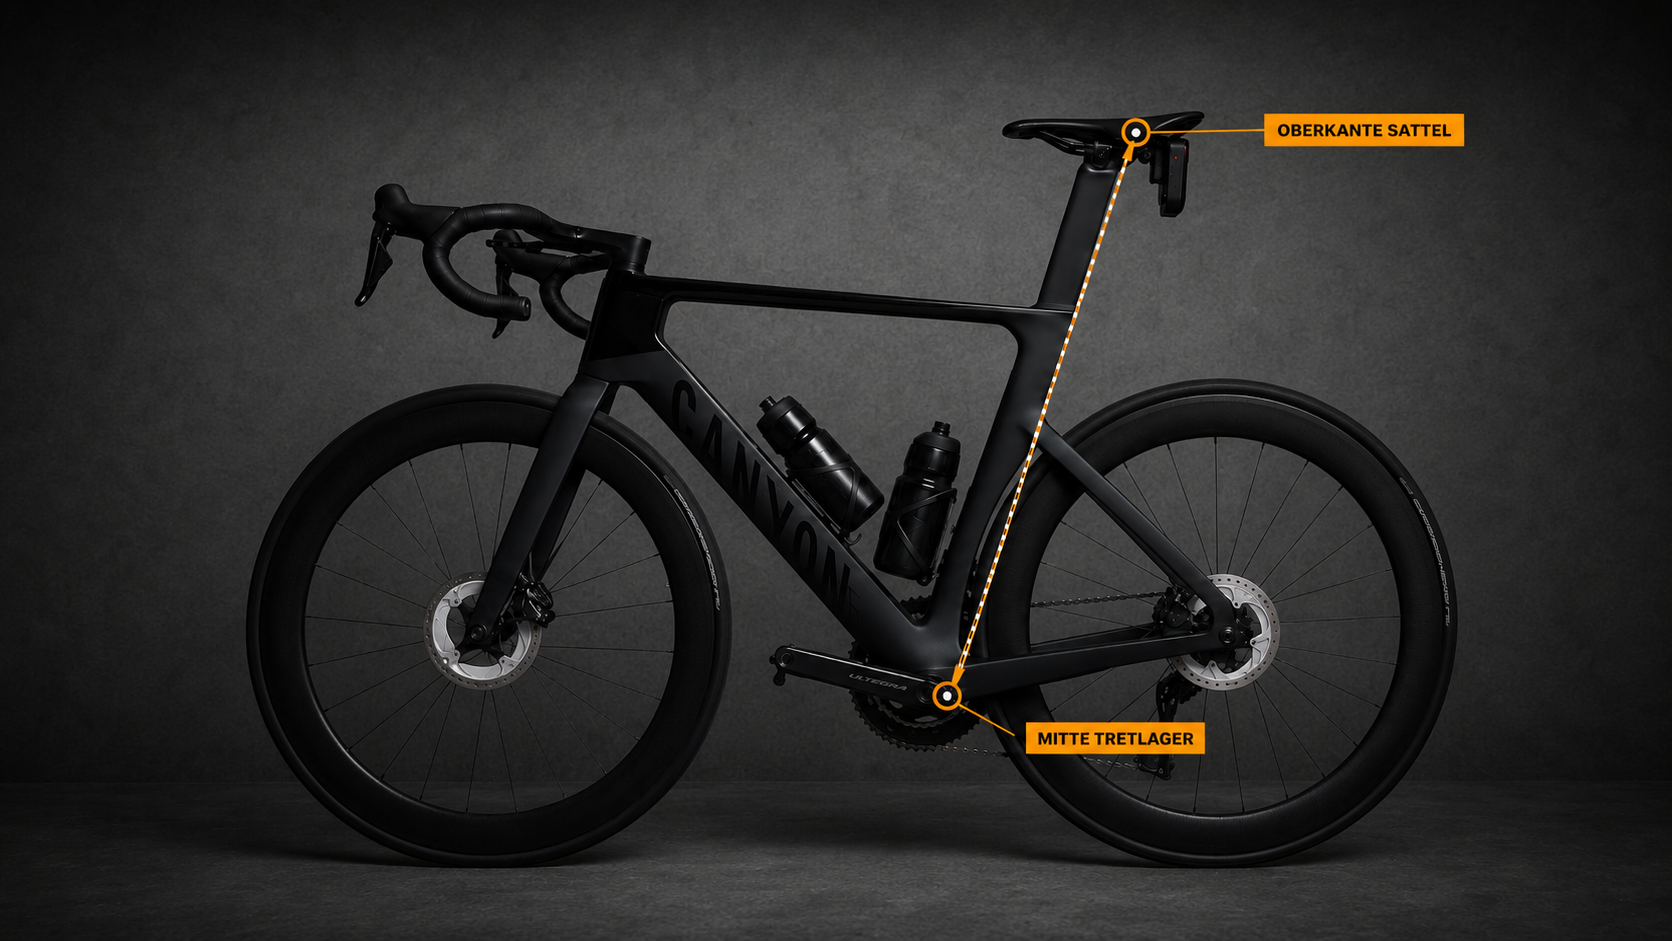
Measuring saddle height on the bike
Measure from the centre of the bottom bracket to the top of the saddle along the seat tube. Use a tape measure and follow the line of the seatpost.
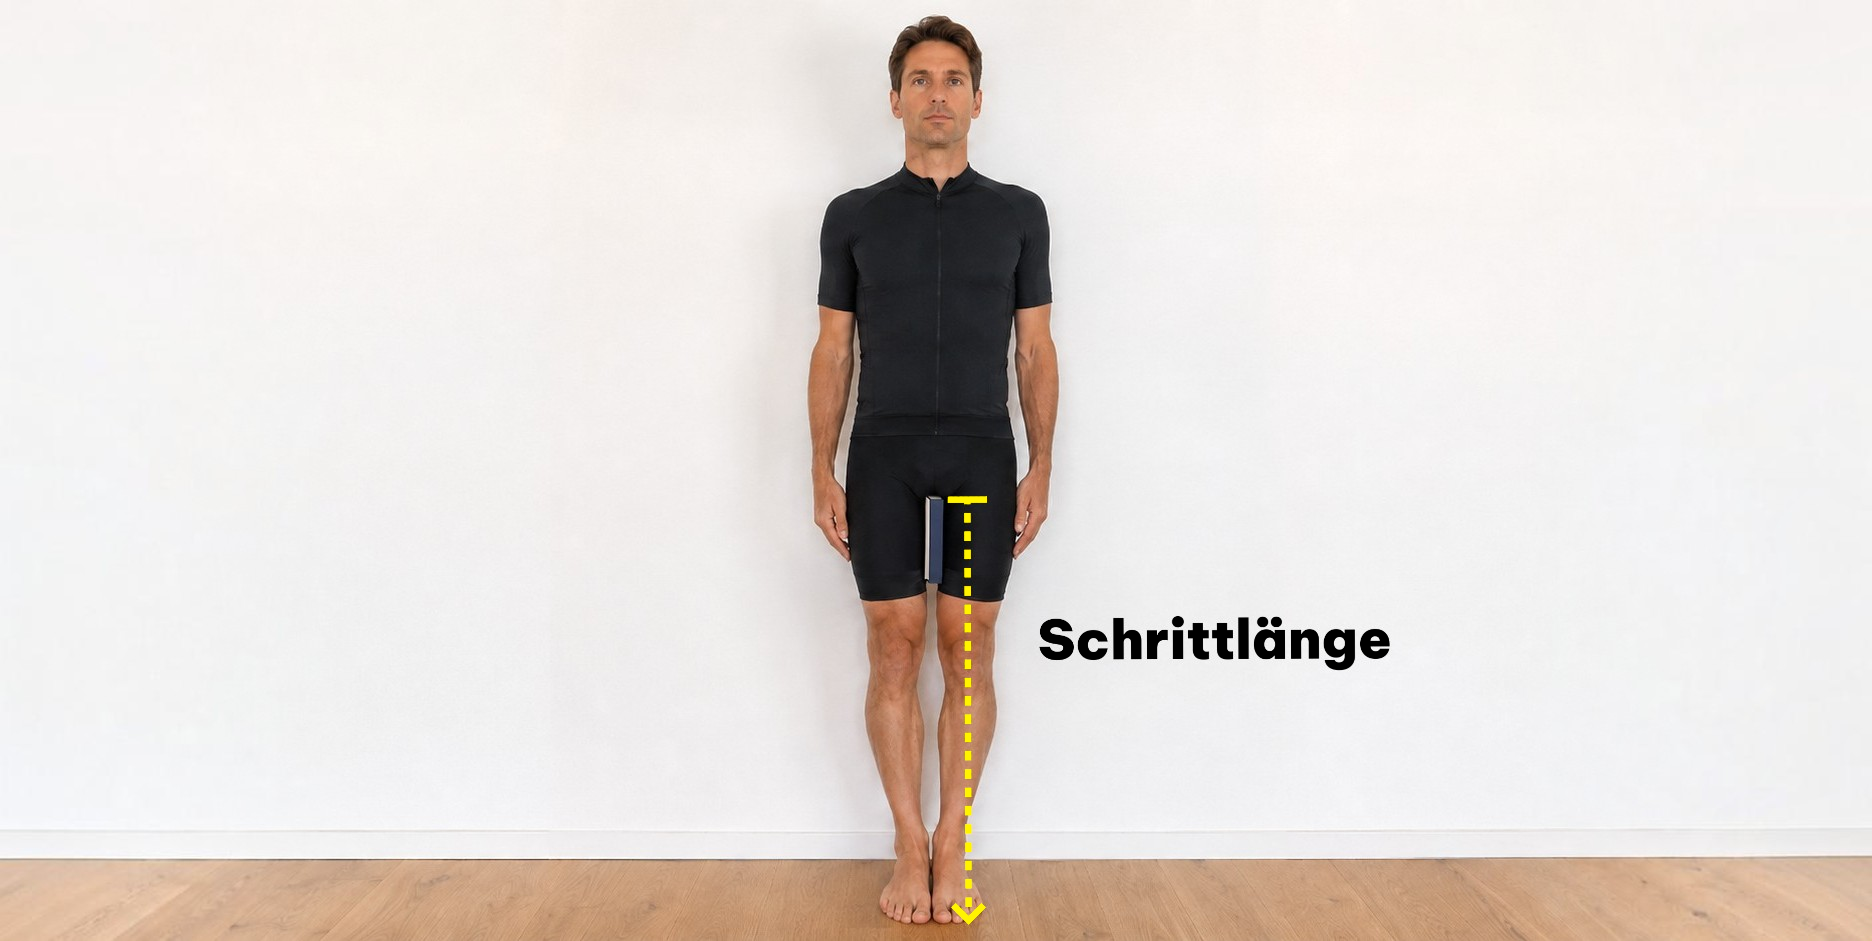
Measuring inseam length barefoot
Stand with your back against a wall. Press a book or spirit level firmly into your crotch and measure from the floor to its top edge.
Adjusting road bike saddle height: measuring inseam and calculating a starting value
- Remove shoes and thick socks. Measure barefoot.
- Stand with your back against a wall, feet about hip-width apart.
- Press a book or spirit level firmly and level into your crotch as if it were the saddle.
- Measure the distance from the floor to the top edge of the book or spirit level.
- Calculate: inseam length × 0.883.
Example: inseam length 82 cm × 0.883 = 72.4 cm saddle height.
Set this value as your starting point. Then test it in practice: when pedalling, your leg should remain slightly bent at the bottom without your pelvis rocking from side to side.
How to recognise an incorrect saddle height
- Too low: pressure at the front of the knee, strongly bent knees, burning thighs.
- Too high: rocking pelvis, straightened leg, unstable pedalling, pain behind the knee.
- A good start: smooth pedalling, slight knee bend at the bottom, steady pelvis.
Keep changes small
Change saddle height in 2–3 mm increments and mark your starting position with tape. Large changes make it difficult to identify what actually improved.
Adjusting road bike saddle tilt
When doing their own bike fitting, most riders are best starting with a nearly level saddle. If you tilt it steeply forwards, you slide forwards and place more support through your hands and shoulders. If the saddle nose is too high, uncomfortable pressure can develop in the seating area.
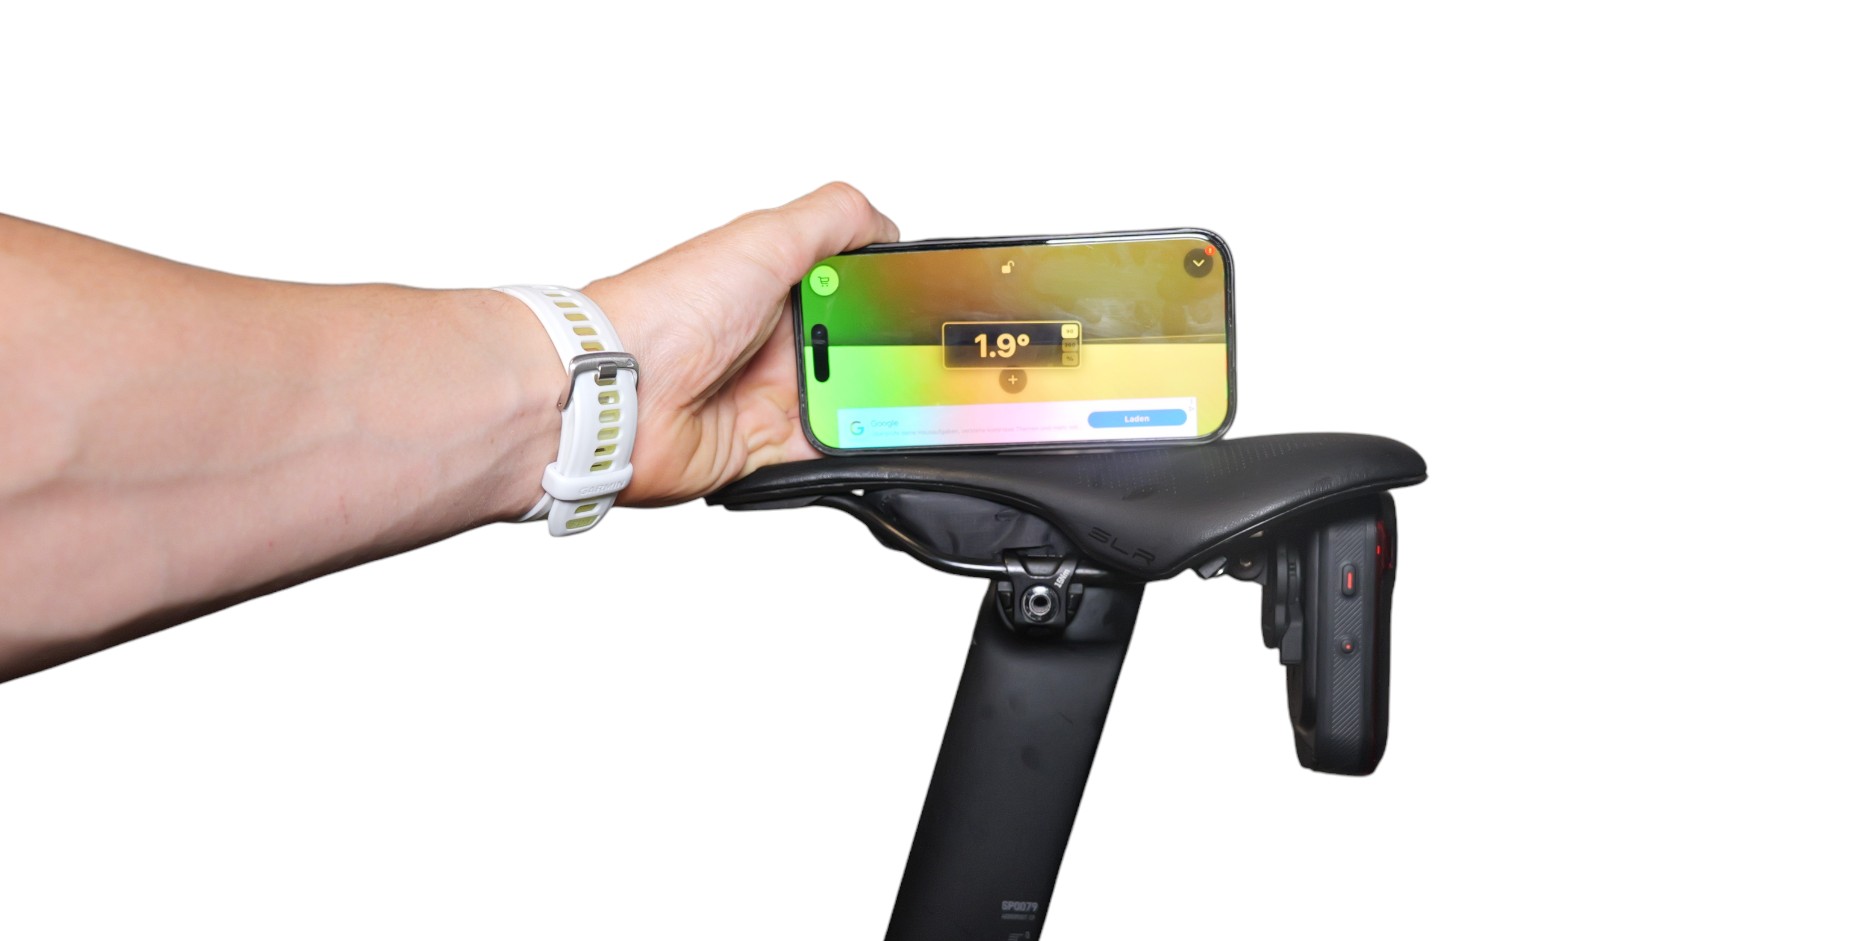
Checking saddle tilt with your phone
A level saddle is the best starting point for most beginners to test. The optimal range is 0-3° (nose tilted downwards)
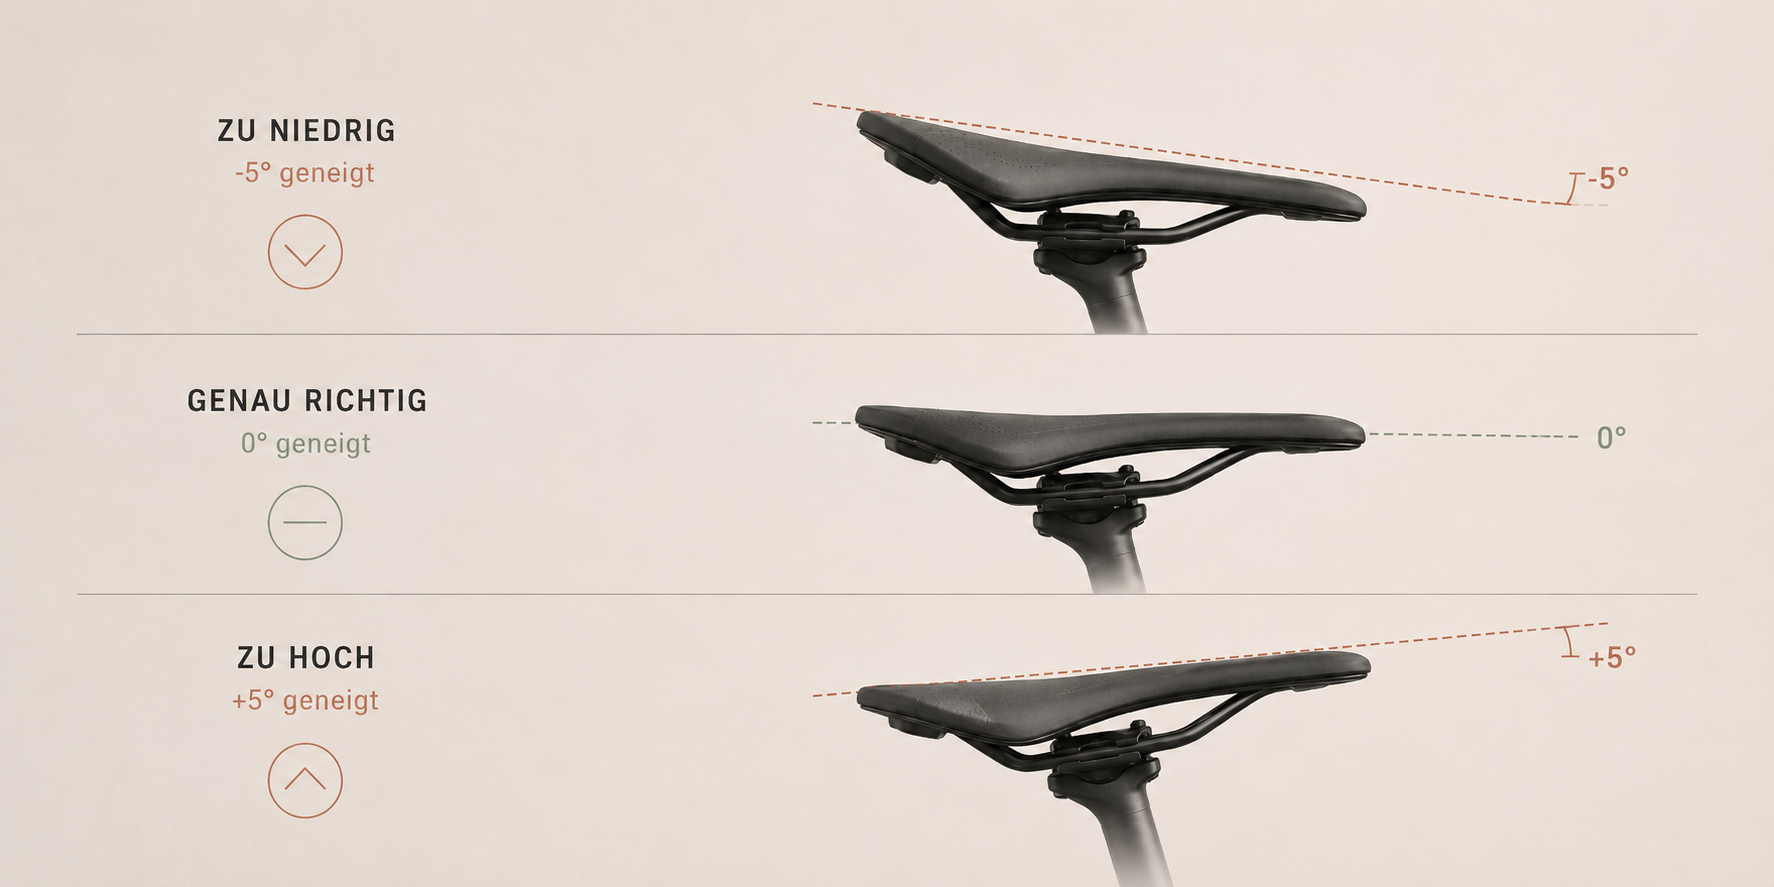
Saddle tilts
Saddle tilt is a small but important factor in bike fitting: studies show that a suitable setting can reduce back and seating-area discomfort. In practice, many riders start with a neutral position around 0°
Road bike saddle tilt: how to proceed
- Stand the bike level or place it in a workstand/trainer.
- Place a phone or spirit level on the middle of the seating surface, rather than only on the raised saddle nose.
- Start with a level position or a very slight forwards tilt.
- Take a test ride: if you slide forwards, the nose is often too low or the overall riding position puts too much weight on your hands.
- If you feel strong pressure at the front, the nose may be too high or the saddle may not suit you.
Do not solve everything through saddle tilt
Pressure on your buttocks does not automatically mean the saddle tilt is wrong. Saddle width, saddle height, shorts, sit bone width or an overly stretched position often play a part.
Road bike saddle setback: moving the saddle forwards or backwards
Saddle setback determines how far forwards or backwards you sit relative to the bottom bracket. In DIY bike fitting, this adjustment noticeably changes how your weight is distributed across pedals, saddle and handlebar. Only move the saddle after the cleats, saddle height and saddle tilt are roughly right.
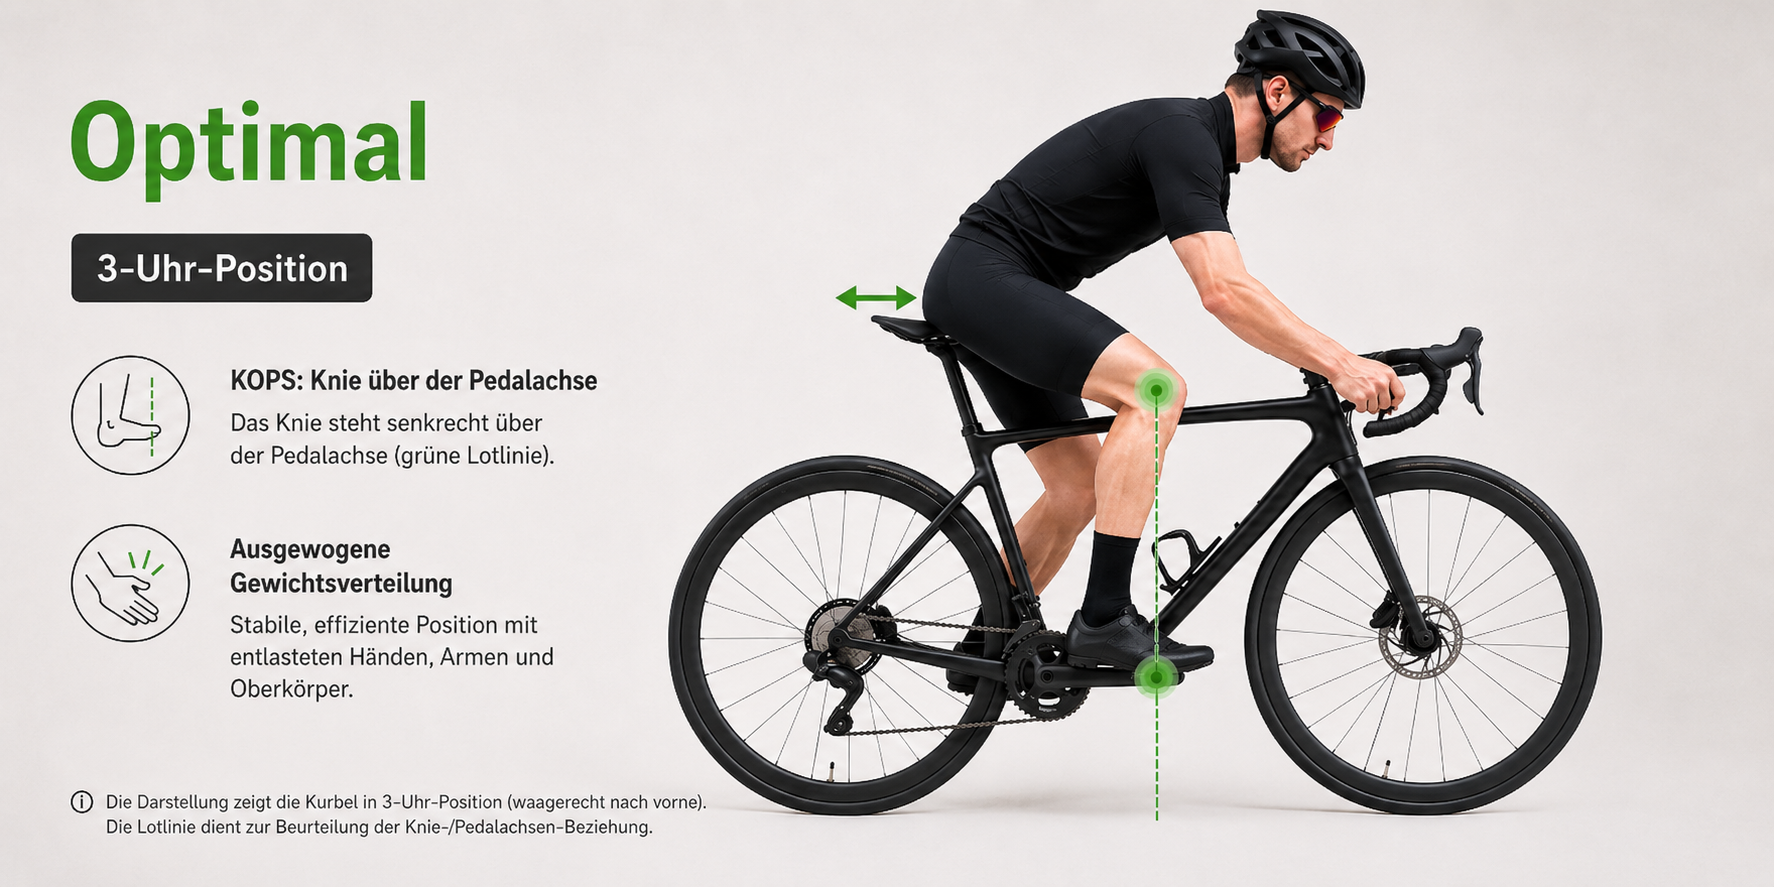
Optimal saddle setback
With the crank at the 3 o'clock position, the knee should sit centrally over the pedal axle so that power is transferred to the pedal as directly and efficiently as possible. This position also helps align the knee joint, hip and foot better and avoid unnecessary strain from a saddle set too far forwards or backwards.
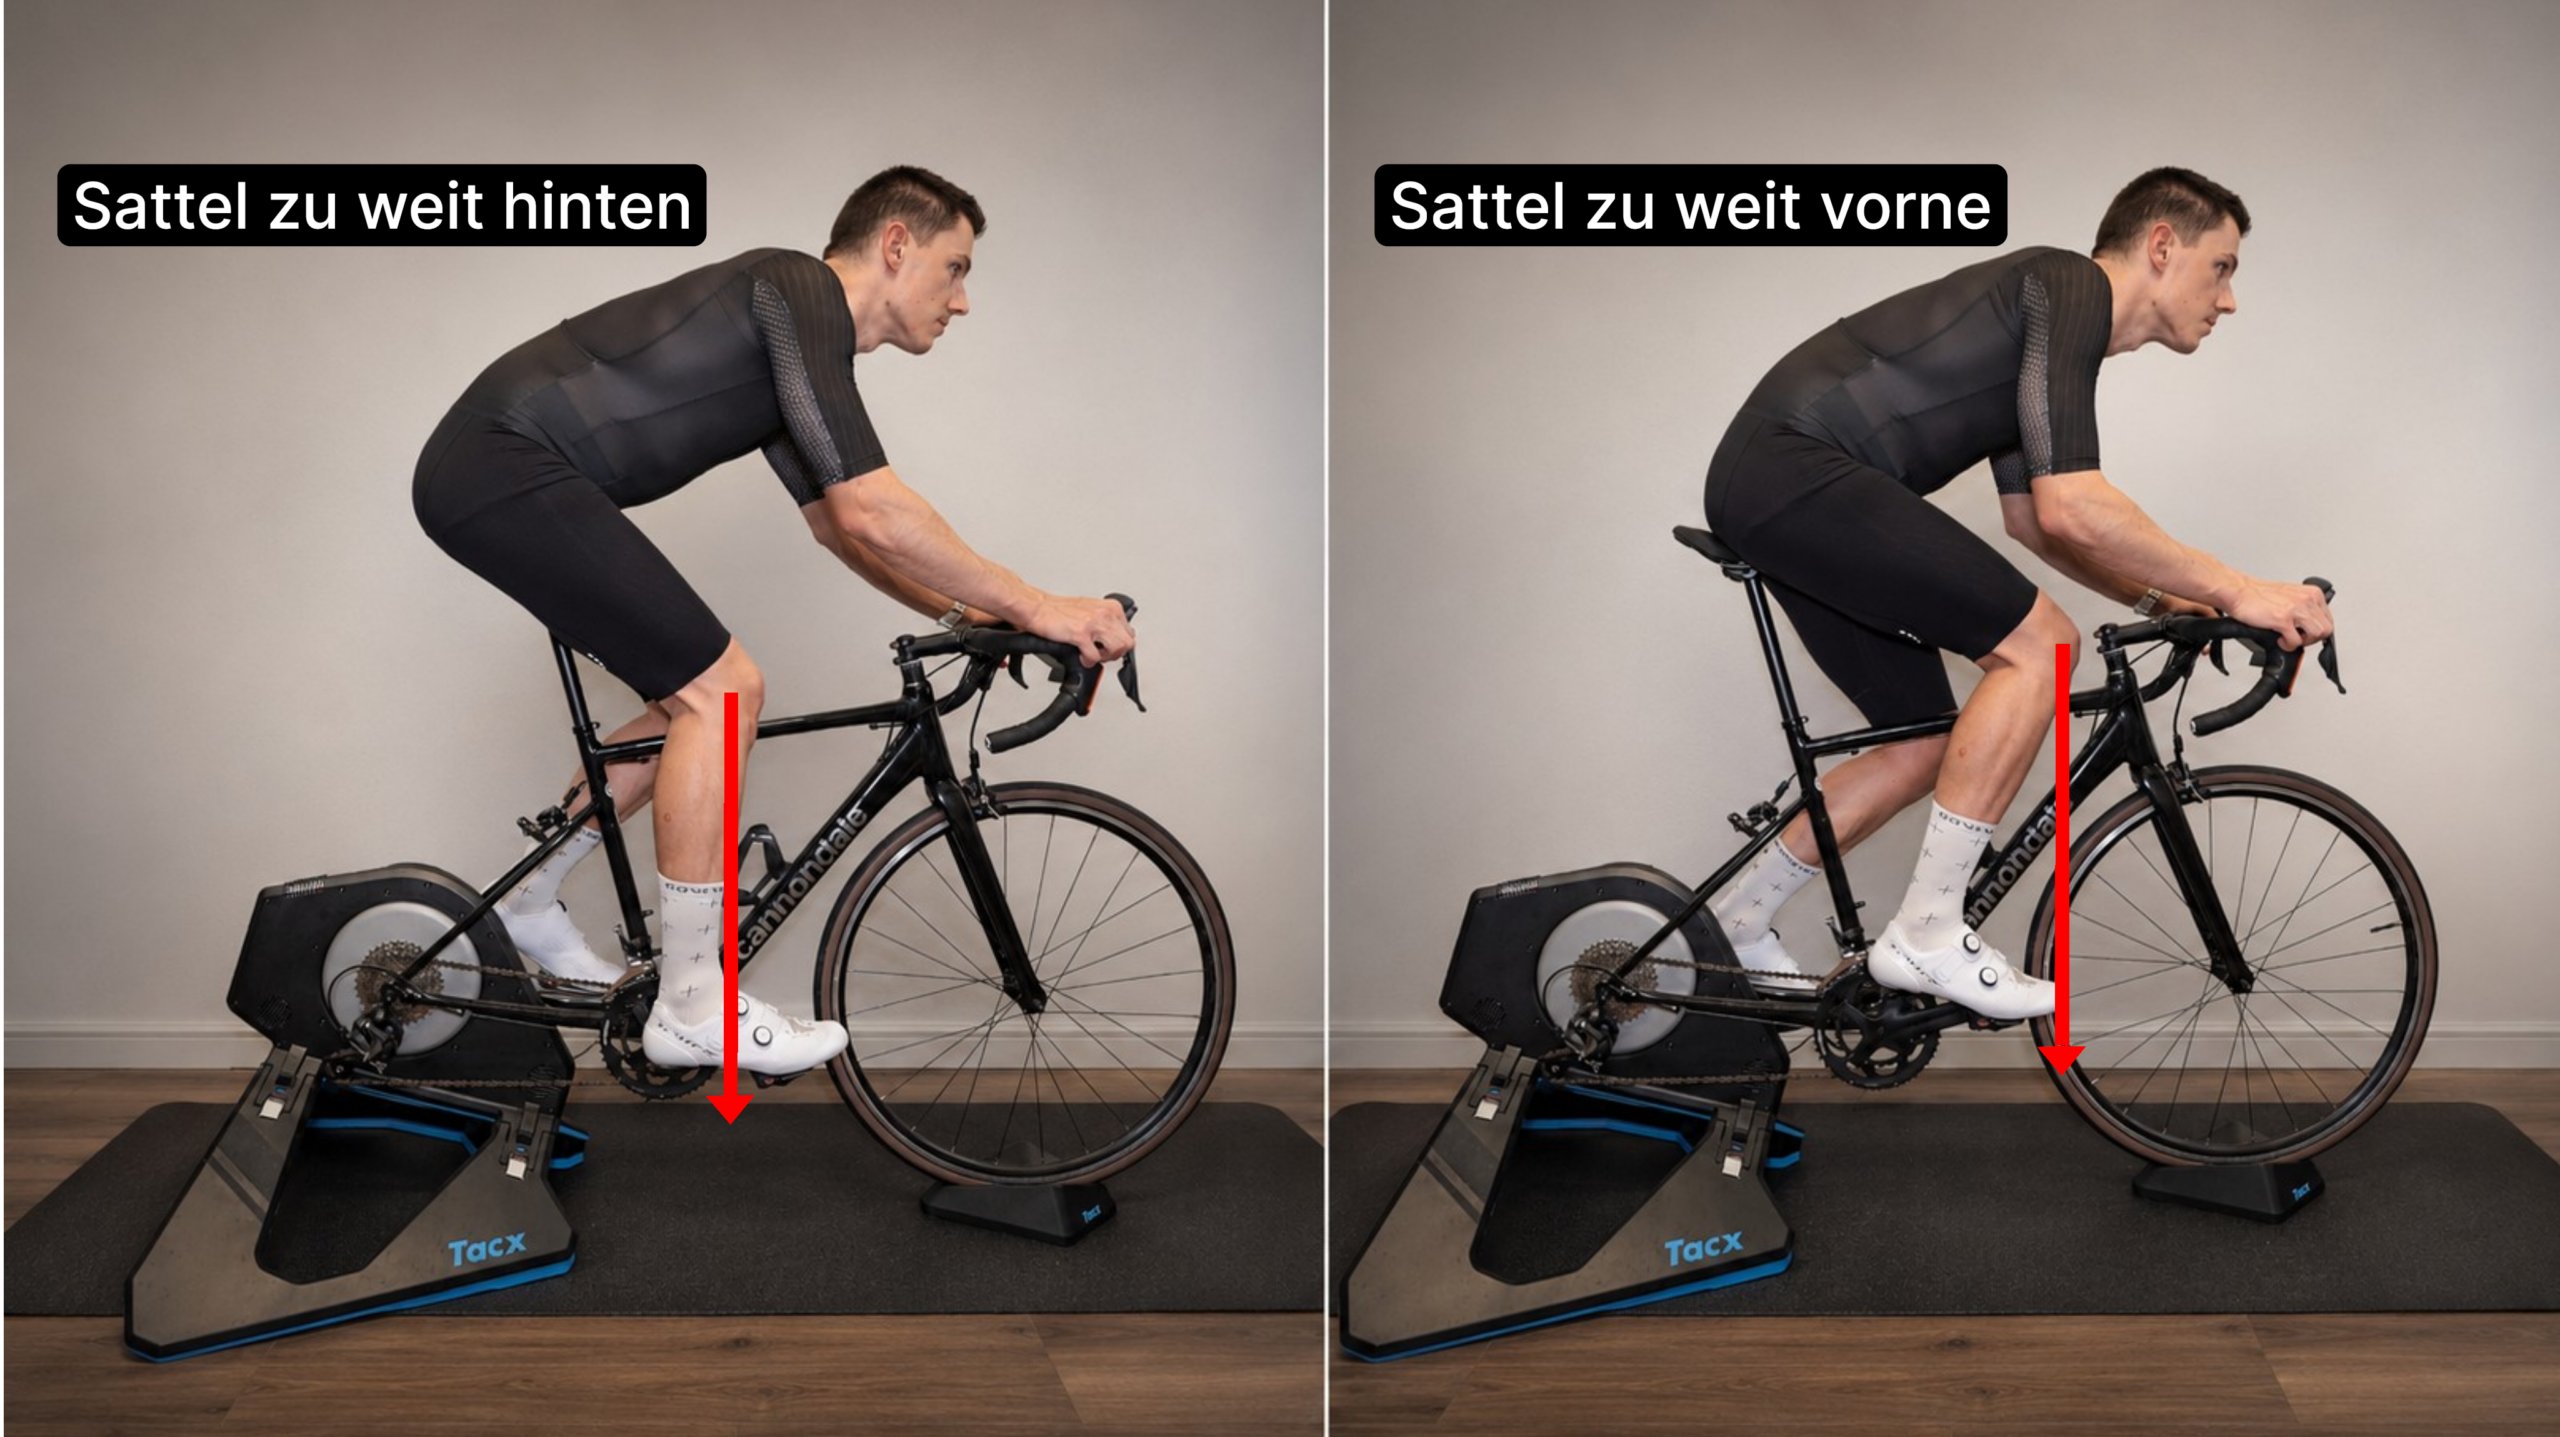
Why the right saddle position matters
If the saddle is too far back, the knee sits significantly behind the pedal axle. This can worsen power transfer, lengthen the reach to the handlebar and place more strain on the posterior muscle chain. If the saddle is too far forwards, the knee moves ahead of the pedal axle. This often increases pressure on the knee and kneecap and can lead to overload or pain over time.
| Sensation | Possible cause | What you can test |
|---|---|---|
| Lots of pressure on your hands | Saddle too far forwards, saddle tilted forwards or reach too long | Check tilt first, then move the saddle slightly back or check the cockpit |
| Pressure at the front of the knee | Saddle too low or too far forwards | Check saddle height, then test moving it a few millimetres back |
| You struggle to get over the pedal | Saddle may be too far back | Test moving forwards only in small increments |
Important
Do not use saddle setback to compensate for an incorrect frame size or a stem that is far too long. If you feel very stretched out, reach also needs checking.
Adjusting road bike handlebar height: using spacers sensibly
Handlebar height affects how much weight ends up on your hands, shoulders and neck. When doing your own bike fitting, only address this after the saddle and cleats are roughly right. A low handlebar looks sporty but is not automatically better. Beginners in particular often ride more comfortably and safely with the handlebar slightly higher at first.
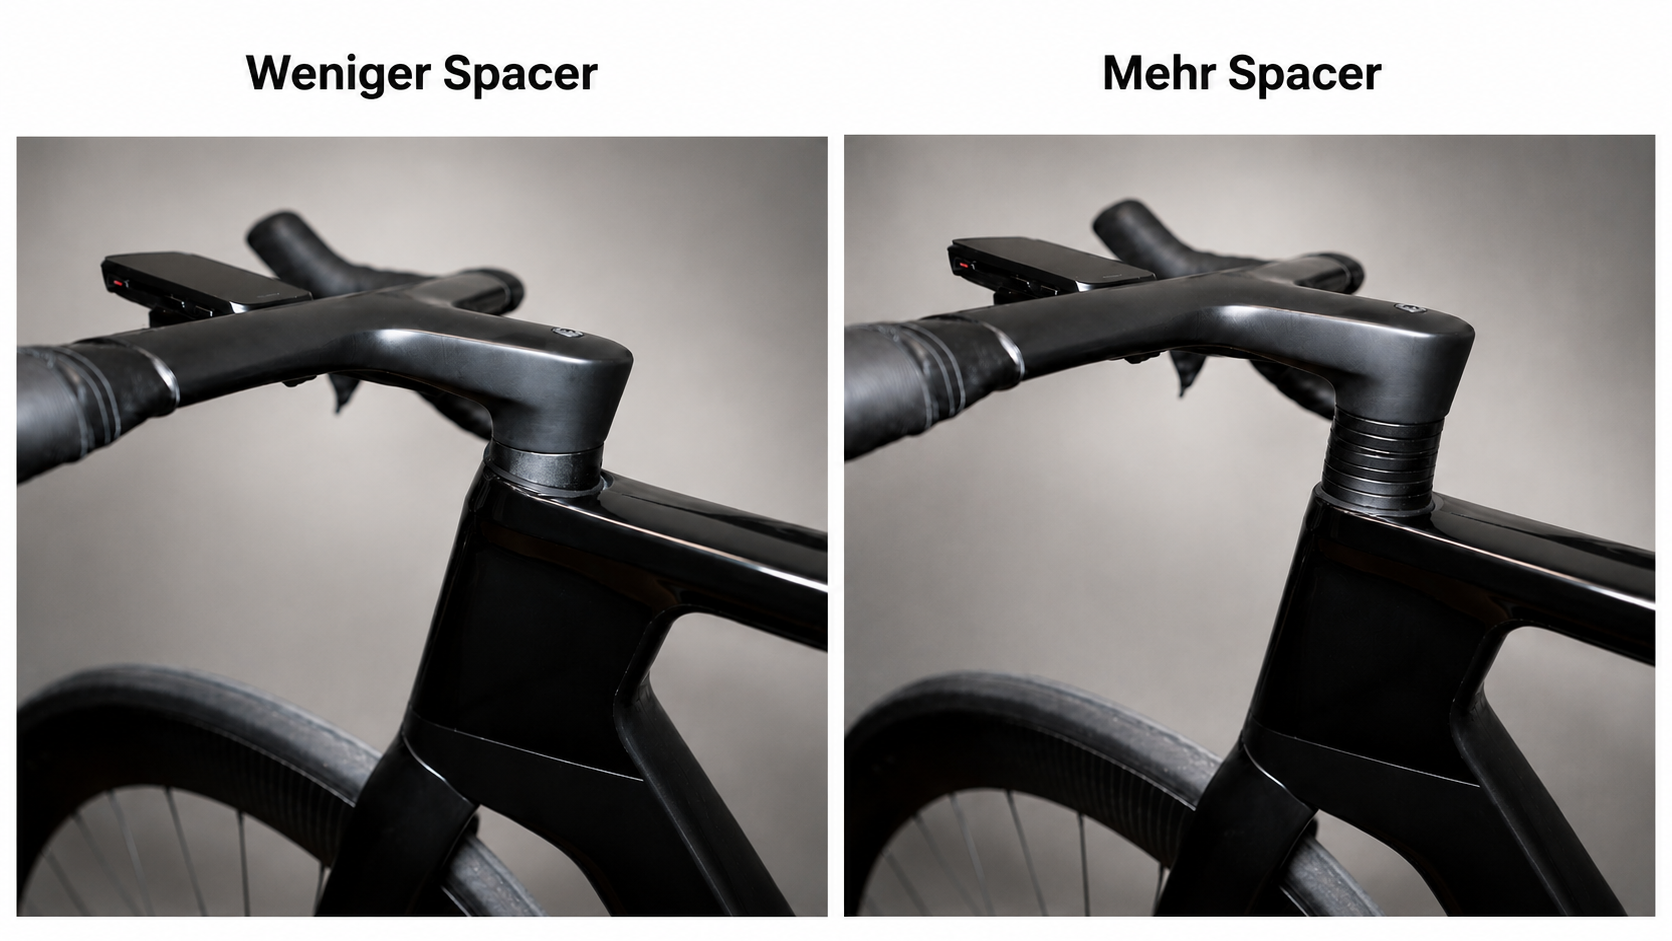
Spacers beneath the stem
More spacers beneath the stem usually mean a more upright position. Fewer spacers make the cockpit lower and sportier.
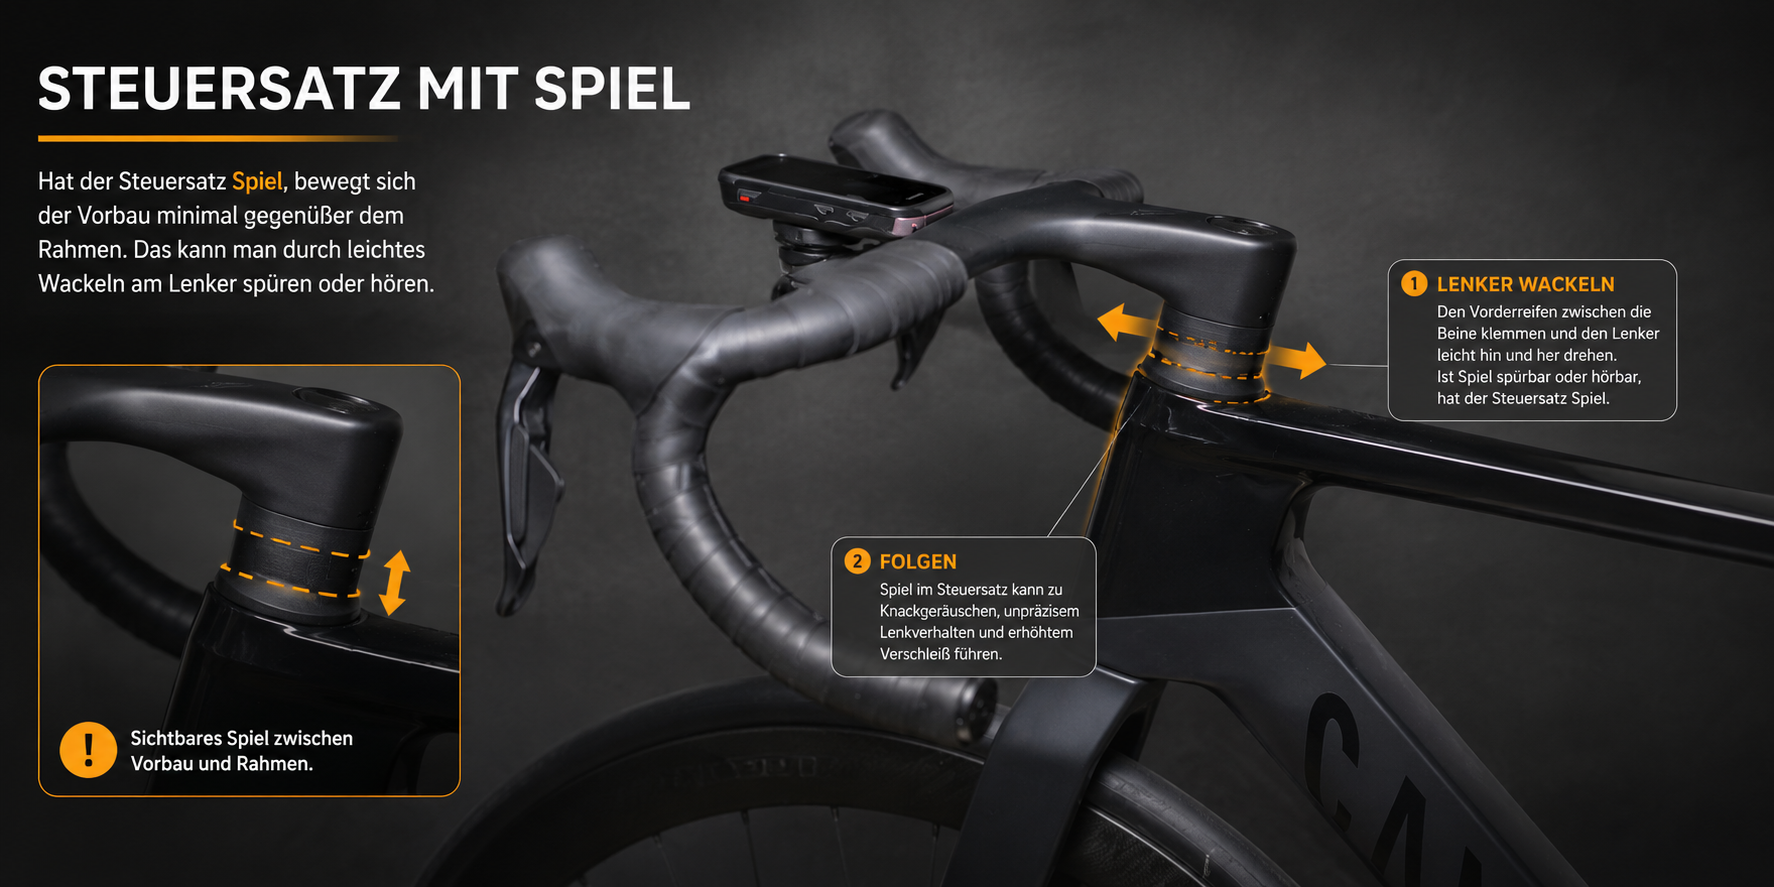
Adjusting the headset correctly
If you reposition spacers, the headset must then be adjusted without play but not too tightly. If unsure, consult a workshop or bike fitter.
Adjusting road bike handlebar height: what beginners can do themselves
- Check whether there are spacers above or below the stem.
- Reposition spacers on simple Ahead stems if you know how to adjust headset play correctly.
- Test small changes first, then check brakes, steering and headset.
What is better left to a bike fitter or mechanic
- Cutting the steerer tube.
- Taking apart integrated carbon cockpits.
- Rerouting brake hoses or cables through a cockpit.
- Modifications involving uncertain torque settings or carbon clamps.
Comfort is not a beginner's mistake
A higher handlebar position can make you faster on longer rides because you breathe more easily, have better control and can maintain the position for longer.
Reach: stem length, handlebar shape and handlebar width
Reach describes how far forwards you must stretch to the handlebar. In DIY bike fitting, reach is also best checked after the contact points, because frame size, stem length, handlebar shape, shift lever position and saddle position all interact. For beginners: you should be able to reach the hoods without fully straightening your arms or tensing your neck.
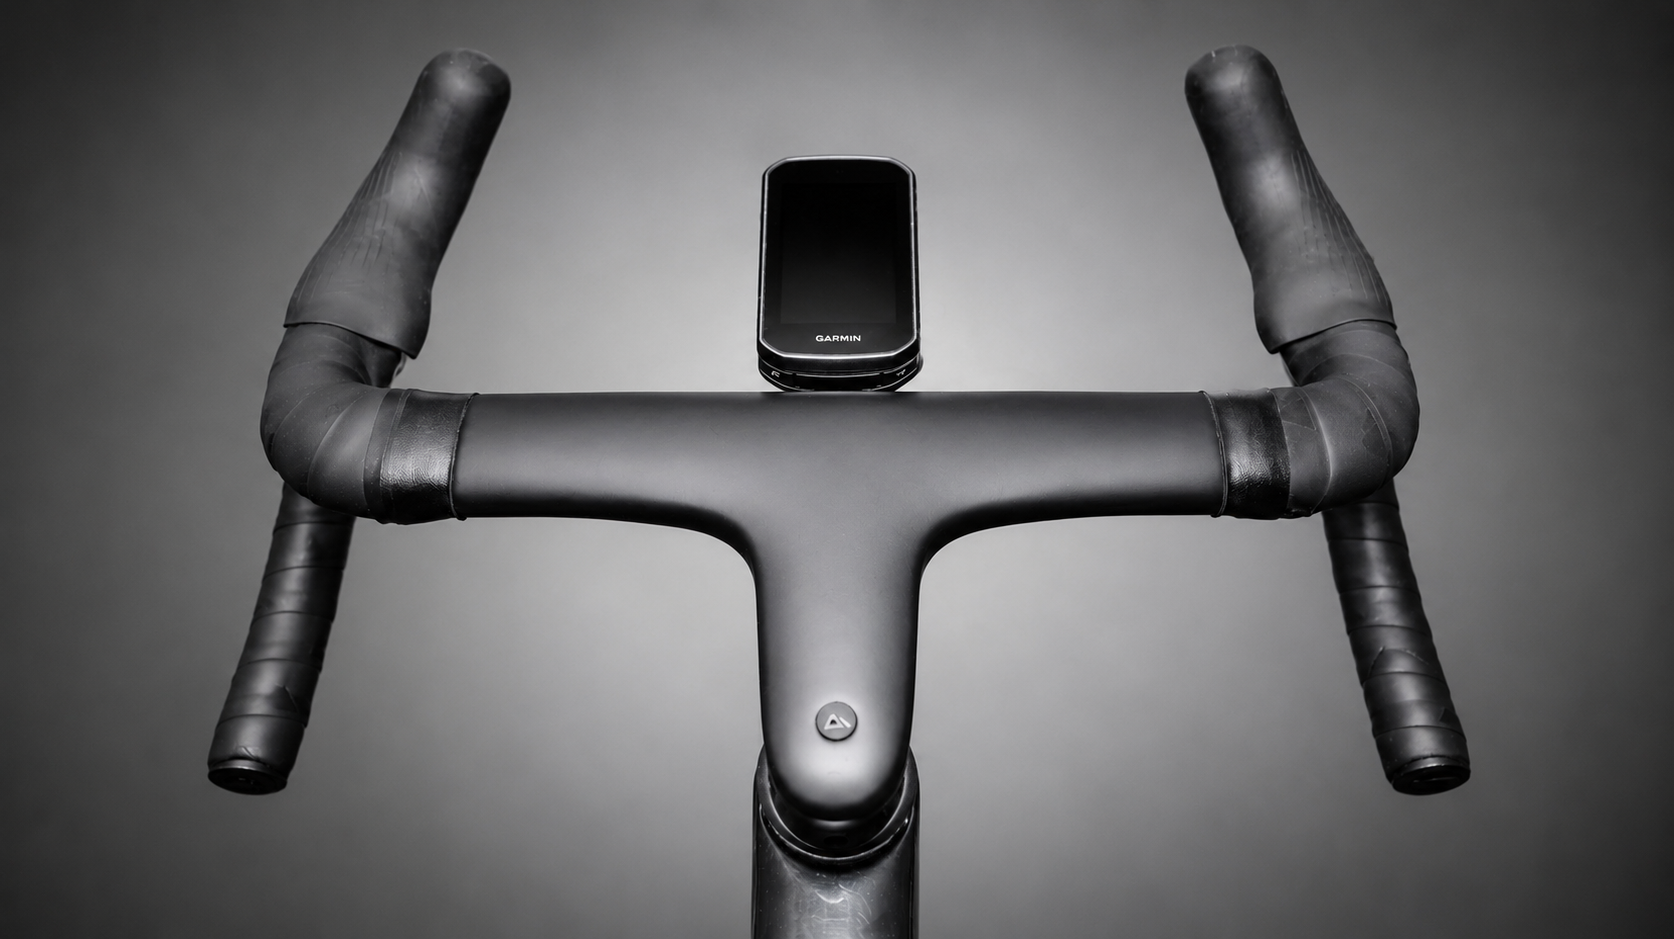
Stem & handlebar shape
Reach comes from stem length, handlebar shape and your overall riding position. The aim is to reach the hoods comfortably without fully straightening your arms.
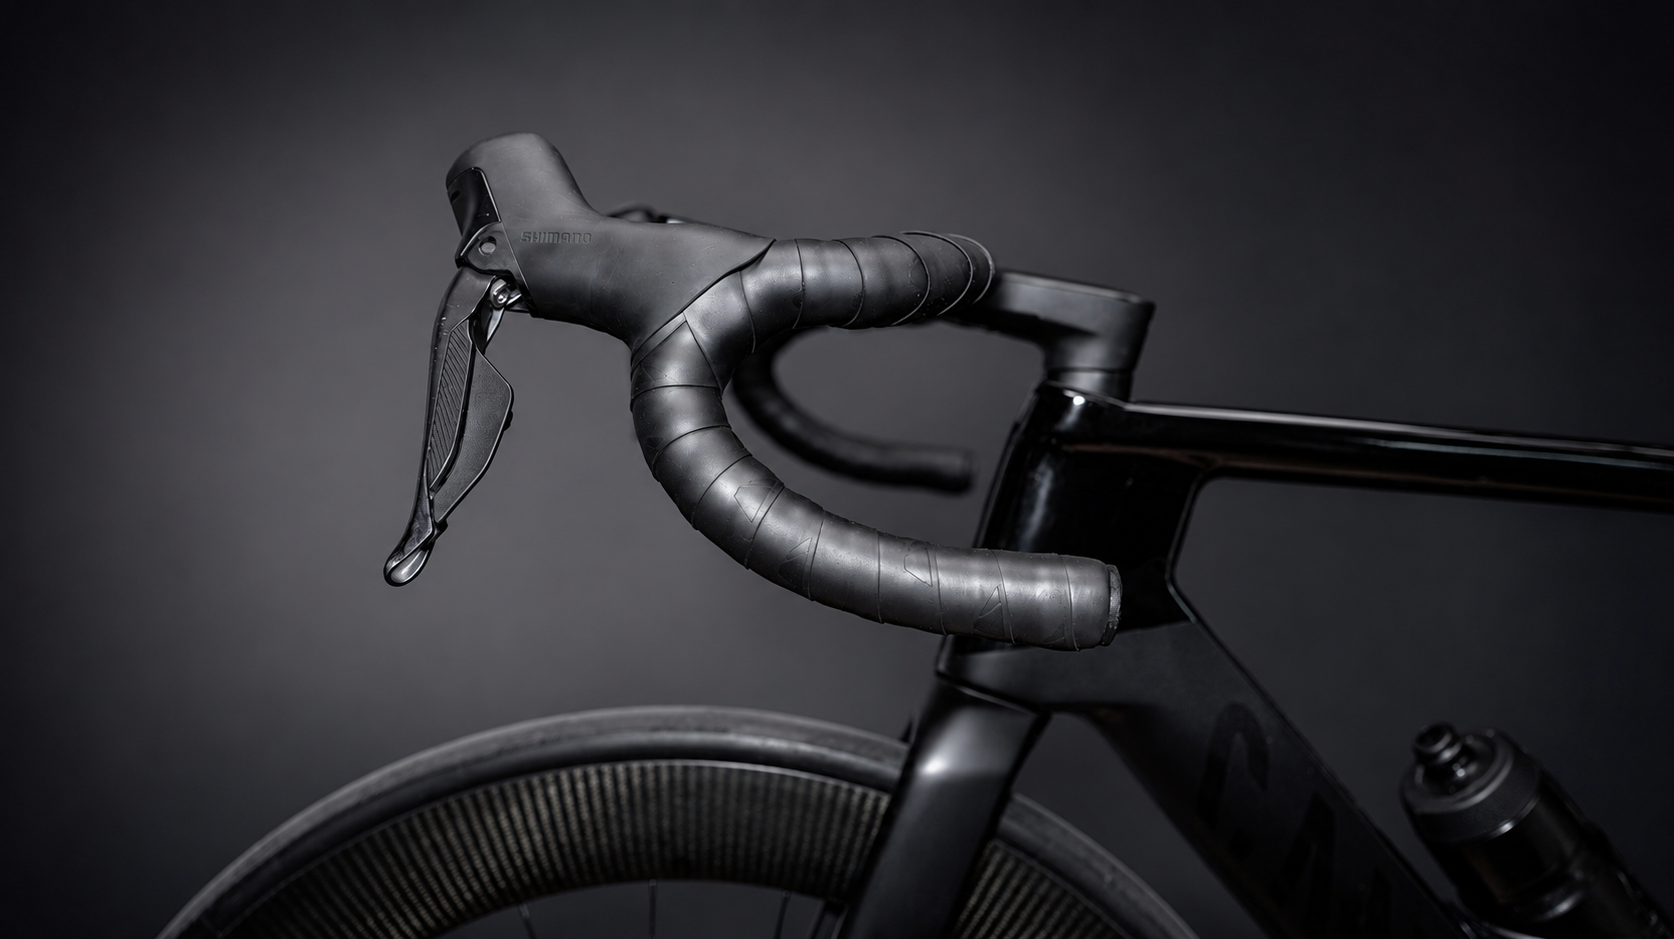
Drop handlebar shapes differ
Handlebar reach and drop vary by model. A compact handlebar is often easier for beginners to use.
How to recognise excessive reach
- Arms are almost completely straight.
- Your shoulders rise and your neck tightens.
- You slide forwards on the saddle to reach the handlebar.
- You never use the drops because they are too far away or too low.
- Braking on descents feels insecure.
Handlebar Width: Consider It When Buying
Handlebar width is often overlooked, but affects shoulder comfort, breathing, control and aerodynamics. Shoulder width provides a rough guide: the bar should not feel dramatically wider or narrower than your natural shoulder position. An overly wide bar can strain your neck and shoulders; a very narrow one may initially feel more nervous and take time to get used to.
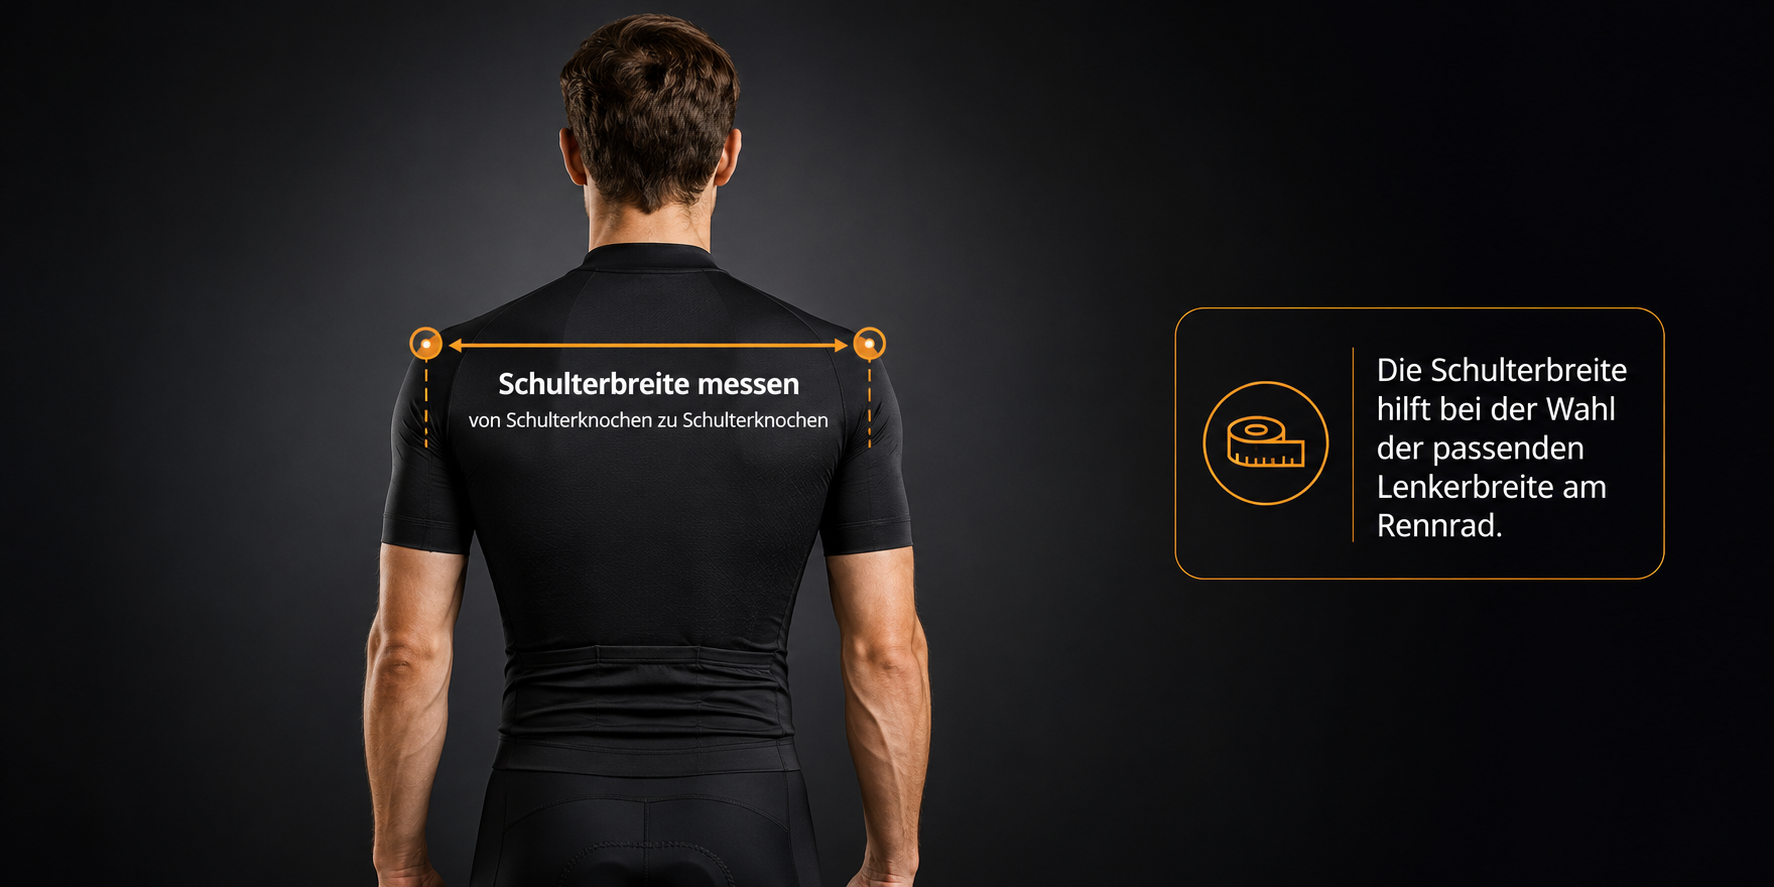
Shoulder Width as a Starting Point
Use your shoulder width and how the grip feels as rough guides. The handlebar should feel natural and allow relaxed shoulders and arms.
On many road bikes, changing width means replacing the handlebar, so check this when buying.
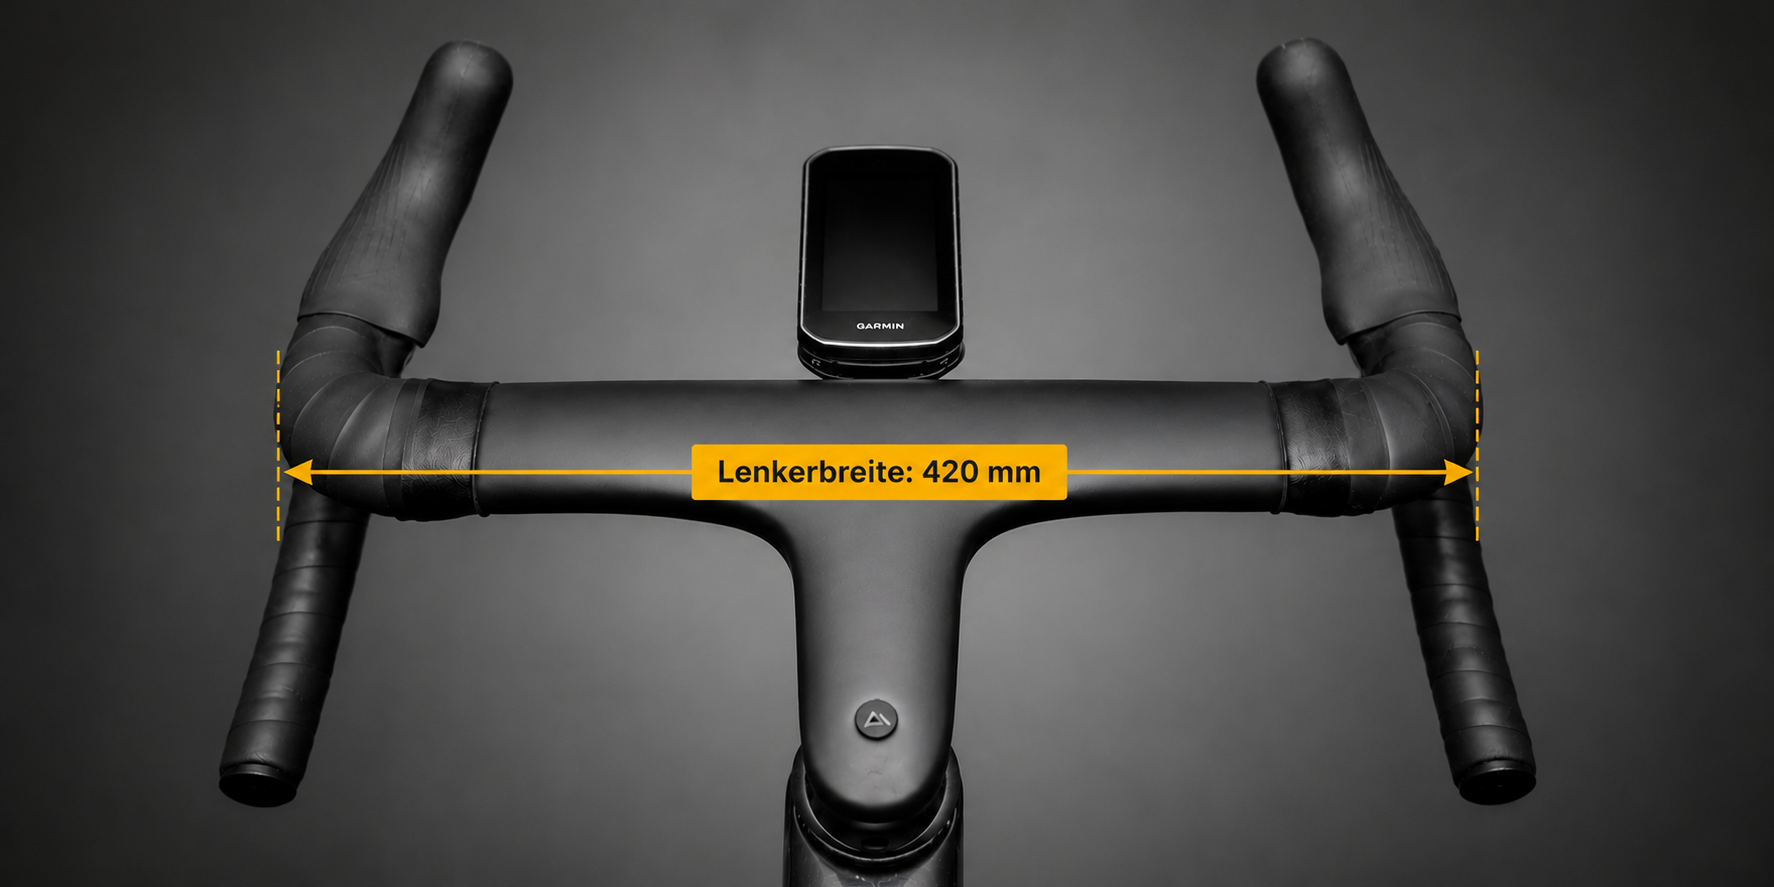
Handlebar Width Often Means Choosing a Component
On conventional road bikes, a different width often requires a new handlebar. Check this before buying.
A Note on the Canyon Aeroad and Adjustable Cockpits
Handlebar width is not easily adjustable on many road bikes, but there are exceptions. Certain integrated Canyon Aeroad cockpits allow width adjustment depending on the system. For the Canyon PACE Bar, Canyon specifies 50mm of width adjustment and additional height adjustment, for example. Always check your specific model and the manufacturer's instructions before working on an integrated carbon cockpit.
What Beginners Can Do Themselves
- Check the fitted handlebar width when buying.
- Measure your approximate shoulder width and compare it with the bar width.
- Only work on adjustable systems according to the manufacturer's instructions, using a suitable torque wrench.
- Ask a mechanic or bike fitter if unsure, particularly with carbon and aero cockpits.
Adjust Shifter Position
Shifter position affects how your hands rest on the hoods and how easily you can brake. This fine adjustment comes last, rather than first. Beginners often ride almost entirely on the hoods, so they should allow neutral wrists and easy access to the brake levers without awkward movements.
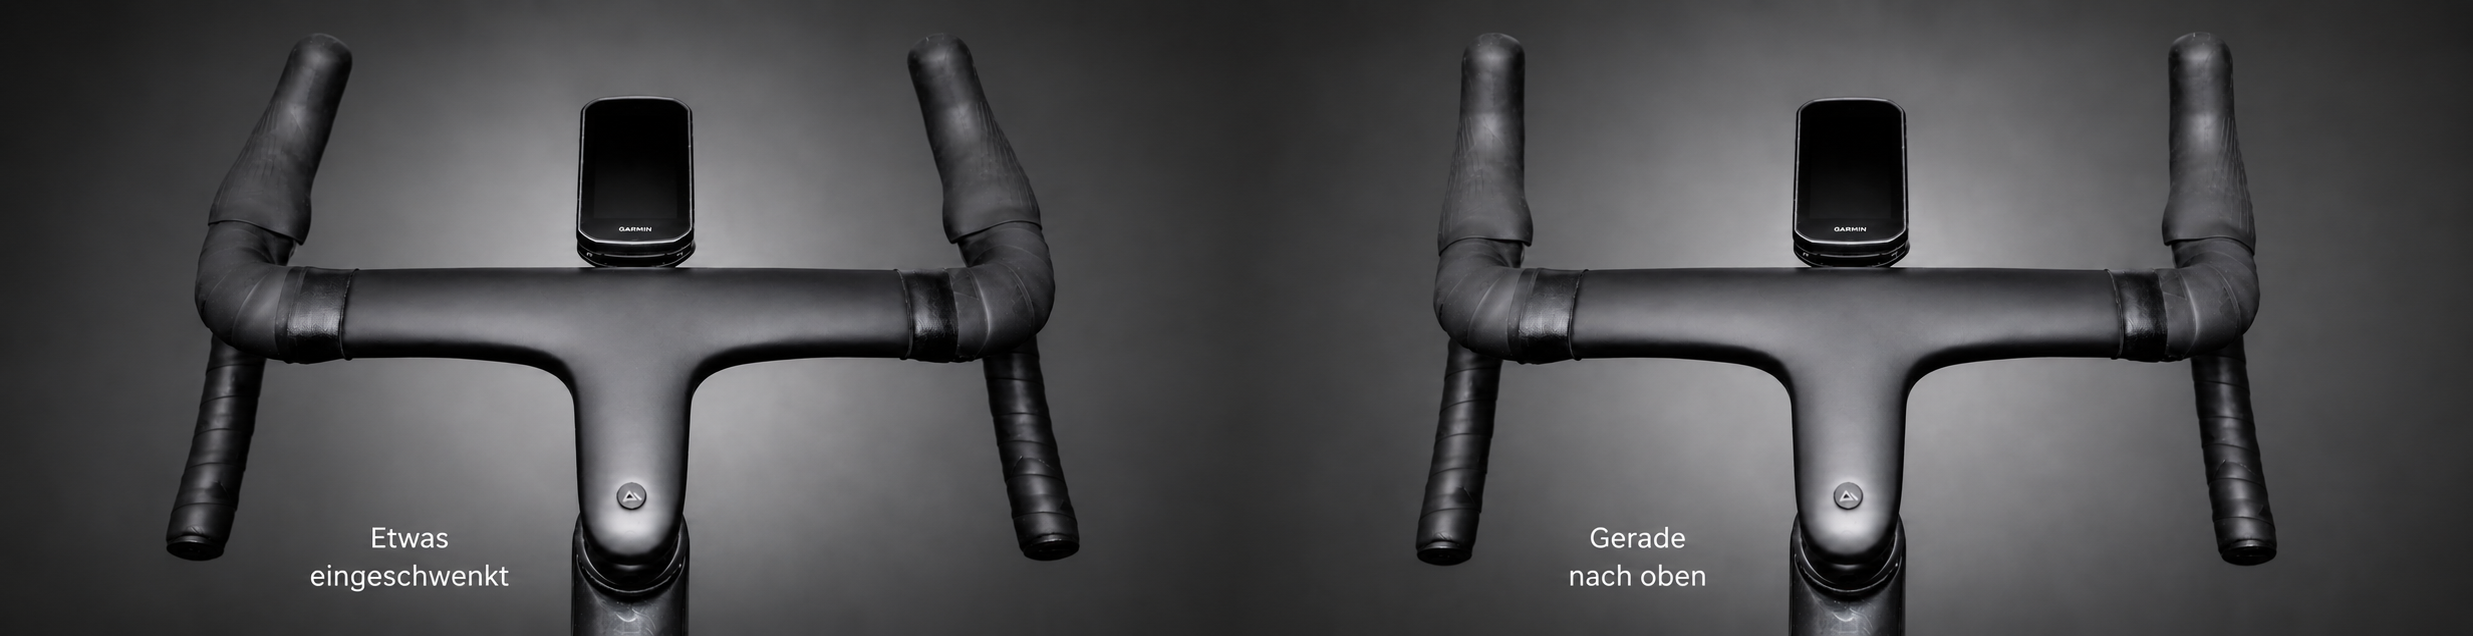
A Smooth Transition from Bar to Hood
Position the hoods to create a smooth transition from the bar, keeping your wrists as neutral as possible.
A Simple Self-Check
- Sit on the bike and rest your hands loosely on the hoods.
- Your wrists should stay as straight as possible, without bending sharply upwards or downwards.
- You should be able to brake without sliding your hand far forwards.
- Brake levers should also remain reachable from the drops.
- Check both sides: left and right shifters should sit at the same height.
Take Care with Bar Tape and Carbon Handlebars
Moving shifters significantly often requires loosening the bar tape. On carbon handlebars and integrated cockpits, use a torque wrench and follow the manufacturer's specifications. If unsure, have the work done for you.
Interpreting Symptoms: What to Check First
Pain or pressure does not automatically mean the problem originates at that spot. When doing your own bike fit, distinguish between cause and symptom. Cleats, saddle and cockpit often interact. Work through the adjustment order again rather than changing things at random.
| Symptom | Common Causes | Checking Order |
|---|---|---|
| Pain at the Front of the Knee | Saddle too low, saddle too far forwards, unsuitable cleat position | Cleats → Saddle Height → Saddle Setback |
| Pain Behind the Knee | Saddle too high or too far back | Saddle Height → Saddle Setback |
| Numb Hands | Too much weight forwards, excessive reach, bar too low, tilted saddle | Saddle Tilt → Reach → Handlebar Height → Hoods |
| Neck Pain | Bar too low/far away, tense shoulders, unsuitable bar width | Handlebar Height → Reach → Handlebar Width → Shifters |
| Numb Feet | Shoes too tight, cleat too far forwards, pressure point | Shoes → Cleats → Insoles |
DIY Bike Fitting: What You Can Adjust Yourself and What a Bike Fitter Should Handle
This guide aims to help you adjust your bike sensibly yourself. DIY bike fitting does not mean attempting every specialist solution without experience. If pain continues despite a good basic setup, or you are working on carbon/aero cockpits, professional help is often cheaper than an incorrectly tightened component or months of discomfort.
Suitable for DIY Adjustment
- Measure inseam and set saddle height
- Check saddle tilt with a spirit level
- Test saddle setback in small steps
- Mark the basic cleat position and fine-tune it
- Check shifter position
- Choose handlebar width deliberately when buying
Better Left to a Bike Fitter/Mechanic
- Persistent knee, back or neck pain
- Complex cleat corrections with wedges or insoles
- Carbon cockpits, internal hoses/cables, cutting a steerer tube
- Choosing a frame size or new bike
- Setting up very aggressive aero positions
Conclusion: DIY Bike Fitting Starts with Contact Points, Then the Cockpit
DIY bike fitting starts with contact points rather than the stem: shoes and cleats, then the saddle, and only then the handlebar. Following this order avoids common beginner mistakes and helps you find a comfortable, controllable and efficient position more quickly.
The key point in one sentence
DIY bike fitting works best in this order: shoes & cleats, saddle height, saddle tilt, saddle setback, handlebar height, reach and shifter position. Test each change separately.
FAQ: DIY Bike Fitting and Road Cycling Position
Can I Do My Own Bike Fit?
Yes, basic road bike fitting is suitable for DIY adjustment. Start with cleats, saddle height, tilt and setback, then check handlebar height, reach and shifter position. Persistent pain, carbon cockpits or complex cleat problems warrant a professional bike fitter.
In What Order Should I Adjust My Road Bike?
Start with shoes and cleats, then saddle height, tilt and setback, handlebar height/spacers, reach through stem length and bar shape, and finally shifter position.
How Do I Calculate Saddle Height?
Measure your barefoot inseam with a book or spirit level held at your crotch. Multiply inseam by 0.883. Measure from the centre of the bottom bracket to the top of the saddle along the seat tube.
How Should a Beginner Set Cleats?
Mark the ball of your foot on the shoe. As a starting point, place the cleat roughly under or slightly behind that line, start laterally neutral and follow your natural foot angle. Then test small adjustments.
What Should the Saddle Tilt Be?
For most riders, a nearly level saddle is a good starting point. Saddles tilted steeply forwards often cause sliding and pressure on the hands.
Can I Adjust Handlebar Width?
Not directly on many road bikes: replacing the bar is often necessary. Some integrated cockpits, including certain Canyon Aeroad systems, provide adjustment. Always check your specific model and instructions.
When Do I Need a Professional Bike Fit?
If pain persists despite your own adjustments, you have complex cleat problems or you want significant changes to a carbon/aero cockpit.
Is DIY Bike Fitting Useful for Beginners?
Yes, if you work systematically and test only small changes. DIY bike fitting is particularly useful for learning to adjust your road cycling position and recognising common mistakes such as an overly high saddle, unsuitable cleats or too much weight on your hands.
Read next
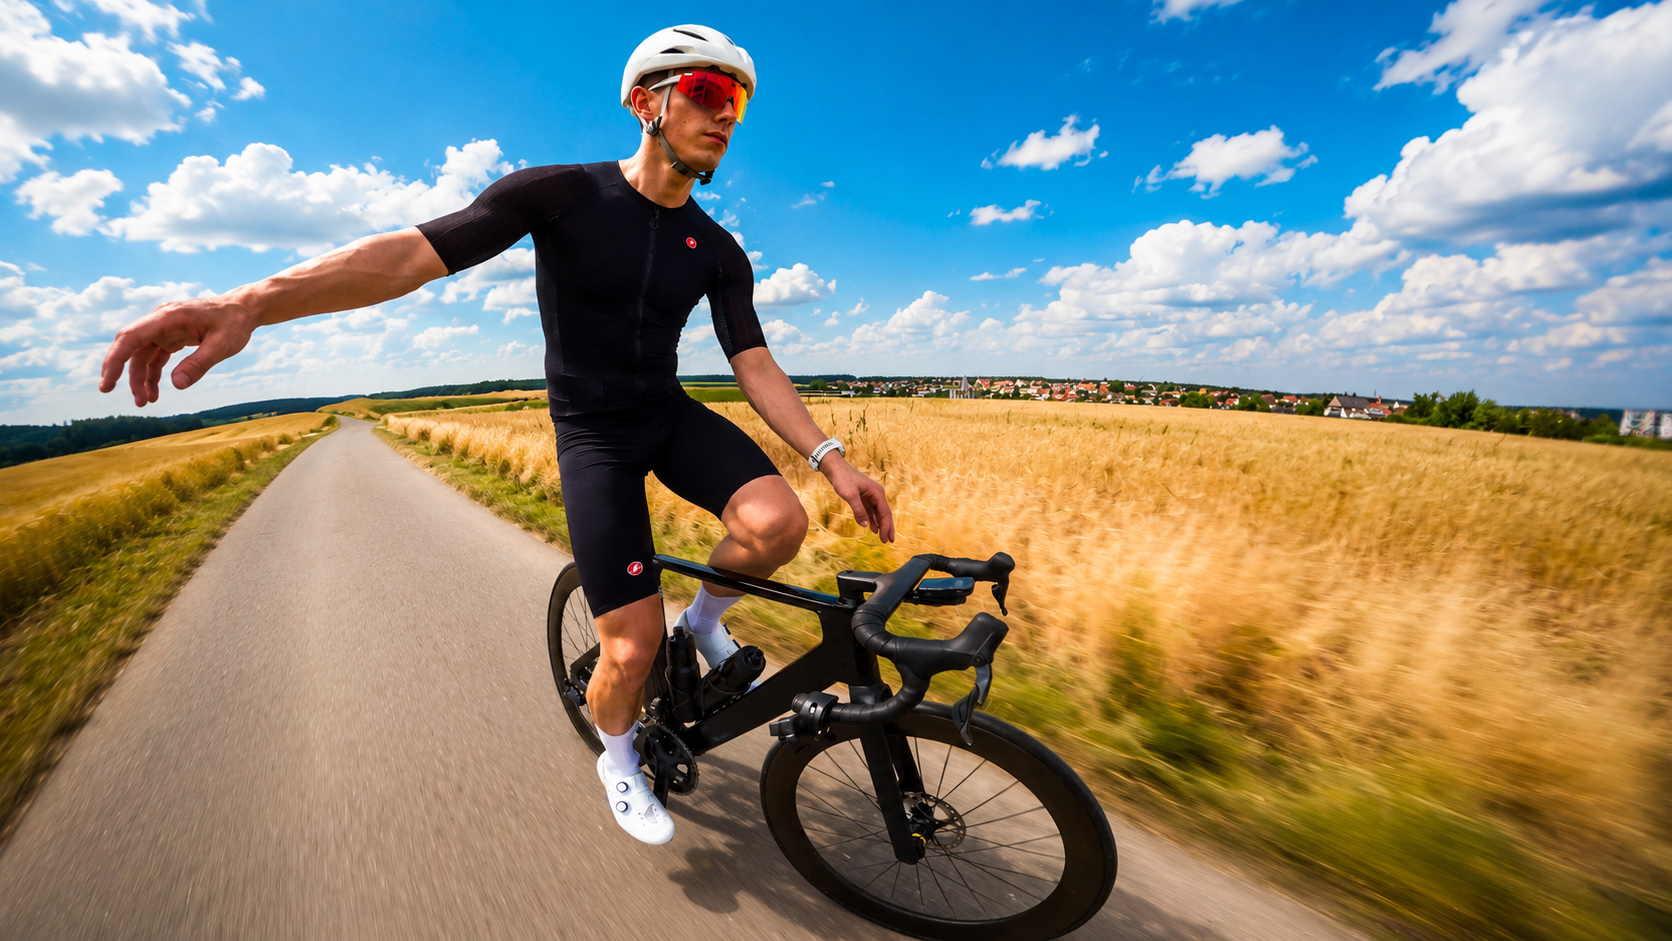
New to road cycling?
Then start with the basics. A suitable position, secure bike handling, good braking and relaxed riding technique often help more initially than expensive upgrades or a particularly aggressive aero position.
View the road cycling basics overview →